
Recently I setup a podcast studio at home, and today I want to take you through the hardware I chose.
WHY PODCASTING?
First though, why podcasting? When I mentioned podcasting to my wife, her immediate reaction was “that’s so 2006.” But with the web so crowded with Tweets, pins, status updates, and blog posts, I have been obsessed with how video and audio help establish a really personal connection between people online.
As I researched podcasting, I heard again and again of the power of “being in someone’s head” for the length of a 30 or 40 minute podcast… that while they jogged or commuted into work, you had their undivided attention. In a crowded world, this is an uncrowded channel.
Why is TV still so powerful? Because people connect with eyes and voice. If you are vlogging or podcasting, you learn how personal people feel their connection is to you. People may feel they know you, just because they have followed your podcast or vlog for a long time. Blogging… similar, but without the eyes and the voice… the connection may not be so pronounced.
PODCASTING HARDWARE
With most modern computers, you can create a podcast with no additional specialized equipment. There is a microphone built right into your laptop or desktop, and there are plenty of free programs to get started.
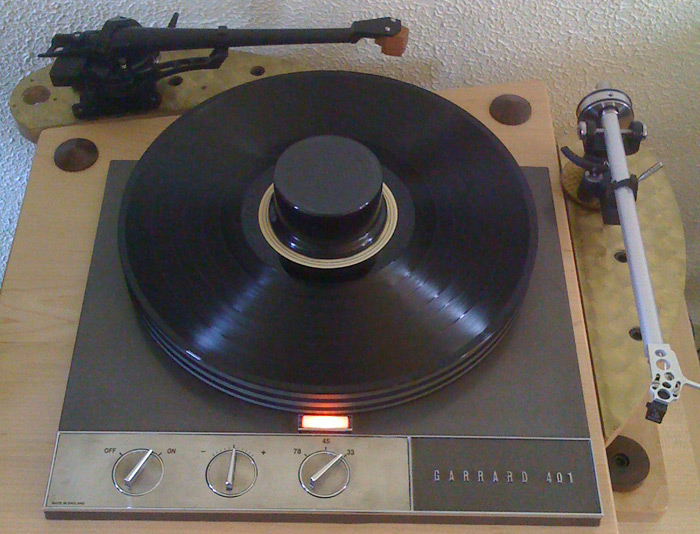
But I am an audio nerd. I believe in the power of good audio, and used to be obsessed with my stereo. It was largely a vintage system, driven by vacuum tubes, and centered around a turntable because it delivers a richer experience than digital files or CDs. Here is the turntable before it was dismantled as I prepared for my son to be born. (delicate things don’t mix with toddlers):
So when I got into podcasting and video, I wanted good audio quality. When people can’t hear you, when there is too much echo or distraction in the audio, it makes it impossible for someone to follow along and become engaged.
So I researched what the pros use. Like many who start in podcasting, I turned to Cliff Ravenscraft who runs a site called PodcastAnswerMan.com.
I looked at what professional podcaster Leo LaPorte uses.
Here is a quick list of my podcast equipment. Below that, I dig way into why I bought each piece of equipment, and things you should consider when you are selecting your own podcasting gear. Prices are approximate:
- Heil PR40 microphone $300
- Heil shockmount $100
- Heil boom $100
- BSW pop filter $60
- DBX Compressor $85
- Allen & Heath Mixer $235
- XLR Cable $10
- 1/4″ audio cables $10
And here is what I bought and why:
THE MICROPHONE
This is the input – the critical first link in the chain. In the past I have used several other microphones for recording audio on my computer. This is my history with microphones for podcasting…
The Blue Snowball microphone is a popular and inexpensive microphone that produces great sound for it’s cost. But… my Blue Snowball had a bug that many of the earlier models had: it recorded audio at a low level. So when I recorded an interview with someone, my audio was always lower than theirs. Evidently, the company had released a firmware update to resolve the problem, but after numerous attempts to contact the company, they never responded.
Despite me being a little upset with Blue, I gave them a second chance, by buying their Yeti microphone next. About twice the money as the Snowball, it produced even better sound, and at the appropriate level. But, I quickly found a problem, the same problem that Andrew Warner of Mixergy.com found when he used it. This microphone has a large stand that rests on your desk. If you type or take notes as you record, the microphone picks up very loud tapping sounds. It became a big distraction for me, so that meant it was time to upgrade again.
The next step most people make is up to the Rode Podcaster microphone. It’s still a USB microphone, and pretty much professional quality. Again, you double the price from the one before it, the Yeti. But this mic asks to not rest on your desk, but to be suspended by a boom, which is really the best solution. So you have to add in that cost, a $100 boom and perhaps a $40 shockmount.
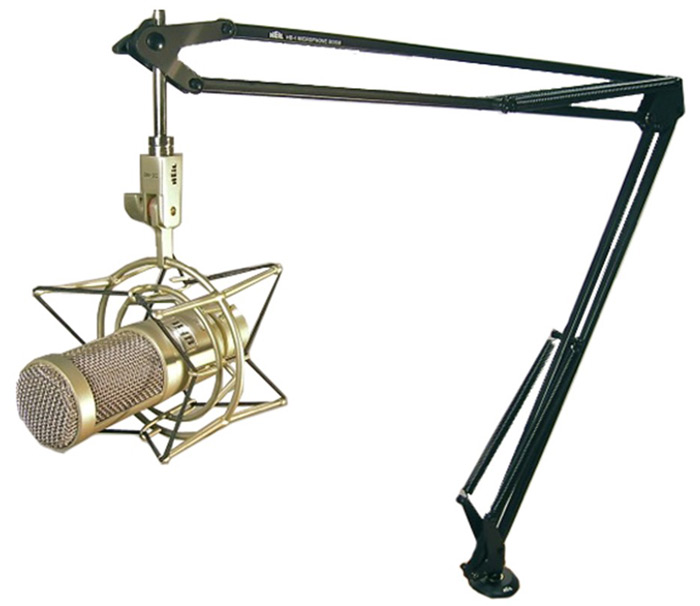
As I did my research, another microphone received glowing reviews by both Cliff Ravenscraft and Leo LaPorte: the Heil PR40. About $100 more expensive than the Rode, at around $325, the Heil seems to offer “dreamy” voice recordings. But… because it was a professional mic, the accessories add to the price. You need a boom and shockmount as you do with the Rode, but the Heil is not a USB microphone. So you need an interface to get the audio from the mic to the computer, and an XLR cable. Here is the mic with it’s shockmount and boom arm:
Being the audio nerd I am, I couldn’t resist seeing what this mic had to offer. So this is what I bought:
- Heil PR40 $300
- Heil shockmount $100
- Heil boom $100
- BSW pop filter $60
The boom and the shockmount create a system whereby any movements don’t disturb the microphone to a degree where it records a bump. It’s like a shock system on your car. That, if someone walks by next to your office, it doesn’t shake the mic and create a noise in the recording. Or more likely, when your leg taps the desk accidently, it doesn’t come up in the recording.
The pop filter helps your “s” sound come off a bit more naturally, and avoids that pop sound you sometimes hear when you say a “p” into the microphone.
THE MIXER
Because the Heil PR40 is a not a USB mic, it needs an interface between it and the computer, for two reasons:
- Pre-amp: this mic does best with a pre-amplifier, which essentially processes and boosts the signal from the microphone. You can buy a pre-amp separately, an interface box, or buy a mixer with one built in.
- We need to convert the signal to a digital signal that has an output with a USB cable so I can wire it into my computer. Likewise, you can use an interface box or mixer for this.
I chose to go with a mixer, because honestly, it just looks more impressive. Okay, okay, it provides greater flexibility for other audio needs too.
I did a TON of research on this, and found lots of folks mentioning Behringer and Mackie equipment. I researched in music forums as well as podcast forums, since musicians obsess over quality and really abuse their gear. Again and again, I found references to Behringer equipment as having lower musical quality and more likely to break. Mackie seemed to be the next step up. In my research, I found glowing reviews of a brand I never heard of: Allen & Heath. In the end, I found a great deal on Amazon on their ZED-10FX mixer. Here it is:

It has a highly respected microphone preamp, great build quality, USB is built right in, lots of channels, and at the price I got it for, I could likely resell it for about what I paid for it. Also: it accepts XLR inputs! Sure, there are lots of things on this mixer that I don’t need, so I just ignore them. I need just one channel right now, not 10. I don’t need any of the special effects it offers.
THE COMPRESSOR/LIMITER/GATE
You know how you hear a radio announcer or DJ on air, and they have a bold and powerful voice that is silky smooth? And then, you go to some county fair and meet them in person, and they sound like Woody Allen? That’s partly because of a compressor/limiter/gate, a little box that does wonderous things to your voice. Consider how Howard Stern sounds on air vs how he sounds in a TV interview. It’s a different voice.
A compressor essentially limits different frequencies in different ways. For me, yes I want my voice to sound better, but since I work at home, I want the microphone to ignore subtle background noises. You know, things like my kid playing two rooms away. Or my kid terrorizing the cat. Or my kid… well, you get the idea.
In researching brands, I found myself overwhelmed with choices, and a bit sheepish to spend yet ANOTHER $200 or $300 to get a decent compressor. I found DBX brand compressors which have a GREAT reputation for sound quality, features, and build quality. And here is the trick I used:
- Buy an older model.
- Buy used.
I ended up with a DBX 166xl. This is VERY similar to their current production model, and because it is a bit older, easier to find used on Craigslist and eBay. I paid $85 for it. Here is the unit:
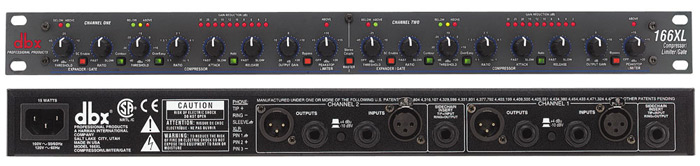
Now, here are the dials (but not my actual settings):

You can see the 2 dials for expander/gate, 5 dials for compression and 1 dial for the limiter. This gives you LOTS of control based on your room, your voice, and the sound you are going for. I found this great video on YouTube where someone takes you through each dial on this unit, I’ve watched this again and again (and again):
This is a two channel compressor, but since for podcasting I am just using it for voice, there is a great switch that couples the two channels into one. There’s also a nice “auto” button that sets Attack and Release for you automatically.
WHERE TO BUY YOUR PODCASTING HARDWARE
Of course, there is Amazon.com, but I know some folks who don’t like Amazon. Another great source for buying audio gear is BHphoto.com. Incredible selection, prices, and service. They have an amazing store in NYC as well, it’s worth the journey there just to see how they manage their inventory.
One discovery I made was BSWusa.com. They had the best prices I could find anywhere, and it’s where I ended up buying the microphone. Hint: if you call their telephone sales rep, they may give you even lower prices than you find on the website.
And for used gear, there is craigslist.org and eBay. Bands and musicians are always selling off used gear.
AUDIO SOFTWARE
Now, on the software side, I keep things simple, I record both audio and video using Screenflow. Um, that’s it. Well, I sometimes convert files to MP3s using iTunes. I suppose I have a lot to learn here… but that is for another blog post.
So after all this, you probably want to know, how does the setup SOUND? Well, here are a couple of examples:
Now as a comparison, you can listen to a video I did with Jane Friedman back in 2010. I was probably using the Blue Snowball mic back then, and it sounds as though she is using the mic that is built into her computer. As you can tell, there are degrees of quality.
So, that is everything I have learned about podcasting hardware so far this year. Ask questions below!
-Dan
Note: I shared an updated blog post on additional podcasting equipment I purchased here.
Dan, Great list but you are missing a most crucial element for podcasting…headphones! We have a great selection at Koss.com and for podcasting in particular the ProDJ200 (http://ow.ly/cdE9M) is a great choice. Feel free to email me ddettmann@koss.com and I can send you some to aid in your podcasting.
Looking forward to hearing back from you.
Drake
Hi Drake – I actually don’t use my headphones when I record the podcast, though I did pickup the AKG K240 Studio headphones on Leo LaPorte’s recommendation. They have amazing reviews for this kind of work, and are mid-priced for what you get.
The cans you mention seem to be well reviewed on Amazon. For serious listening, I have a pair of top of the line Grado’s. A-MAZ-ING sound through those!
-Dan
Thanks for all the great info on podcasting equipment. I have shied away from vlogging and pod casting since I am a non-techie and all that equipment tends to give me hives and high blood pressure. It is a realm I’d love to step into though (eventually) and your newsletter this week made it seem much less scary. When I played with the band I left it up to one of the “techie” guys to deal with the equipment. Since I don’t have anyone around these days with those capabilities I guess I’ll have to bite the bullet and learn it myself. This info has given me a nudge in the right direction.
Thanks Laura!
Thanks for both the reasoning behind your decision and the specifics about equipment. I’ll pass this info on to my book writing classes–great info for them to build their following.
Thanks Lisa! Yes, I OBSESS about this stuff as I decide, so I’m glad that process helped.
-Dan
Excellent post Dan! I remember a conversation I had with the CEO of BSW in 2005 about podcasting. Have you noticed an uptick in traffic and more importantly has it translated into anything measurable? I’m always interested in learning how web publishers are benefiting from the technology.
Thanks Doug. The truth is, I have been WILDLY inconsistent with my own podcast. That speaks to the dedication involved to find success.
-Dan
So… do you hook your mic straight into the dbx and gate/compress before going into the mixer, or are you going out of the mixer into the dbx (and then I guess back into the mixer to get the signal into a comouter?) I would think I need mic to preamp, to gate/compressor, to mixer and then to PC but maybe I’m missing something? I’m shopping now for equipment to start podcasting and trying to get it right, thank you for sharing this info!
It is hard for me to see all of the wires now the way I have it setup, but I believe the mic goes into the mixer which is ALSO a mic pre-amp. Then there is a separate send to the gate/compressor. Hope this helps.
Hi Dan
Thanks for this amazing post. I am impress with the Allen & Heath ZED-10FX. Can you do a mix minus to record Skype conversations with this mixer? I see on the specifications that it have only one aux send.
Best regards
Melvin
Thanks Melvin. Honestly, I have no idea the answer to that question. Sorry!
-Dan
Yes you can do mix-minus. The Aux Send is for that. I *think* you can use the FX Send as an Aux too just don’t pass effects through it. So there may potentially be two.
Thanks!
Guess what? I think the 2010 interview makes you sound the most natural and clear. After that the Hyatt interview and the other podcast sound too contrived and massaged. Too much presence “oh, he’s talking into a microphone” and I don’t know if “My audio podcast” was recorded with the same gear as the Hyatt interview but it sounds the least pleasant. Noisy and breathy.
Art,
Thanks for the feedback! I know what you mean, how sometimes the “best” recording of a voice on a podcast (or even YouTube) can come across as inauthentic. Much appreciated.
-Dan